Creating a powered track in Minecraft can revolutionize the way you transport items and players across your expansive world. Whether you’re building a large-scale farm or setting up a grand transportation system, mastering powered tracks is essential for optimizing your logistics. This guide will walk you through every step of the process, offering practical examples and actionable advice to make your journey in Minecraft smooth and efficient.
Understanding the Problem and Its Solution
One of the biggest challenges in Minecraft is managing large quantities of items across different biomes and structures efficiently. Crafting, mining, and gathering resources can be incredibly time-consuming, especially when you need to transport large quantities of items over long distances. Powered tracks offer an automated solution, enabling you to transport items quickly and reliably without the need for player intervention. This guide will provide you with the knowledge and tools to set up a powerful and effective powered track, saving you time and effort and allowing you to focus on more creative and expansive projects in your game.
Quick Reference
Quick Reference
- Immediate action item: Gather the necessary materials including rails, powered rails, redstone, hoppers, chests, and a power source.
- Essential tip: Ensure proper alignment of rails for the powered rails to function correctly, placing them parallel and adjacent to each other.
- Common mistake to avoid: Forgetting to include hoppers; these are crucial for item collection and movement along the powered track.
Step-by-Step Guide to Creating a Powered Track
To create a powered track, follow these comprehensive steps. Each section will take you from understanding the basics to setting up an efficient and functional track.
Materials Needed
Here’s what you’ll need for your powered track:
- Iron rails
- Powered rails
- Redstone dust
- Hoppers
- Chests
- Redstone block or repeater
- Source of power (e.g., Redstone lamp, Daylight Sensor, or any other power generator)
Step 1: Gathering Materials
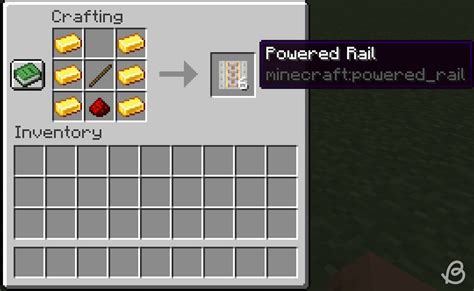
Before you start building, make sure you have all the necessary materials. Collect iron rails by smelting iron in a furnace and obtaining coal for power. Use a crafting table to create powered rails by combining iron rails with redstone dust.
Step 2: Setting Up the Base Structure
Lay down a line of iron rails where you want your powered track to run. Align them parallel to each other. The distance between the rails should be no more than a single block apart to ensure that the powered rail can connect properly.
For example, if you’re planning a track that stretches from your farm to your base, lay the rails down a straight path. Here’s a visual representation: Rails:
- — — — — — — — — —
Next, place powered rails at each segment, directly connected to the iron rails. These powered rails will enable item transportation when activated by redstone.
Step 3: Incorporating Redstone Activation
To activate the powered rails, place redstone dust at the first segment of your track. Connect the redstone dust to the powered rail using another redstone dust piece. This creates an electrical path to power the segment.
A common method is to use a redstone repeater, which extends the signal distance without losing strength. Place the repeater in front of the powered rail and set it to a medium delay to allow for sufficient activation time.
Step 4: Adding Hoppers for Item Collection
Hoppers are crucial for collecting items from the track and moving them into chests. Place hoppers beneath each powered rail segment, ensuring that they face the direction of the track.
Here’s an example setup: Powered Rail:
- — | — | — | —
- | Hopper
This setup ensures that items placed on the powered track are collected by the hoppers and directed into the chests. Place chests directly beneath the hoppers to store the items.
Step 5: Testing the Powered Track
Test your powered track by placing items on the rails and observing their movement. If everything is correctly set up, the items should move along the track smoothly, collected by the hoppers and stored in the chests.
Step 6: Expanding Your Track
Once you’ve tested your initial track, you can expand it as needed. Simply follow the same steps, ensuring that the rails are aligned and that powered rails are correctly activated and connected.
Practical FAQ
Can I make my powered track loop?
Yes, you can create a loop with a powered track, but you need to be careful to avoid creating an infinite loop, which could cause the game to lag or crash. To create a loop, you must place the redstone activation at the end segment back to the first segment, ensuring there’s a small gap to prevent continuous power flow. You could do this by placing a redstone repeater and dust in a way that creates an “X” shape for the power flow, directing the powered rail back to the beginning.
How do I ensure my track doesn’t get blocked?
To prevent your track from getting blocked by other items or players, use water buckets to create waterways around your track, or set up a collision system using pistons and redstone to push unwanted items off the track. Additionally, place hoppers and chests at intervals to collect items from the track and prevent overcrowding.
With this comprehensive guide, you now have everything you need to build and optimize your Minecraft powered tracks. By following these steps, you can create an efficient and reliable system to transport items across your game world, saving you time and effort and allowing you to focus on the more creative aspects of Minecraft.